Knowing that a DIS moves bonds between demat accounts is one thing; filling one out correctly is another. Investors often end up with rejected or delayed DIS forms over tiny mistakes, like a DP ID that doesn’t match, a field that has been left blank, or a signature that doesn’t quite match the records. To avoid all that hassle, this guide will take you through the DIS form step by step, focusing on debt securities like NCDs and corporate bonds, so you can get it right on the first try.
Start investing with just ₹10K & grow your wealth with fixed return opportunities.
Invest Now

How to Fill a DIS
Filling out a DIS correctly matters more than it might seem, especially for bonds, which are less actively traded than equities and rarely offer a quick fix once something goes wrong. A wrong ISIN, mismatched receiving account, or missing signature doesn’t just get sent back for a quick fix; your DP might just reject the whole thing outright, or worse, those bonds could end up in some random demat account, and then you’re looking at a reverse transfer to undo the mess.
That’s why the process follows a fixed, sequential structure rather than a free-form form: you request the booklet from your DP, fill in the security and receiving-account details, sign exactly as per your registered signature, and submit the form back to the same DP currently holding the bonds, not the one receiving them. Each step exists to catch a specific kind of error before it becomes a costly one, which is why most delays trace back to skipping ahead, like guessing a receiving Client ID instead of pulling it from the CMR.
You request the booklet from your DP, fill in the security and receiving-account details, sign it exactly like your registered signature, and then submit the form back to the same DP that’s currently holding the bonds (not the one that’s supposed to receive them). Each step is designed to catch a specific kind of error before it becomes a costly one, which is why most delays happen when people try to skip ahead, like guessing a receiving Client ID instead of pulling it from the CMR.
Must Read: Delivery Instruction System
Before getting into the field-by-field breakdown, here’s a look at the sample form issued by CDSL. While your broker’s version may look slightly different in layout, the core fields you’ll need to fill remain largely the same across DPs.
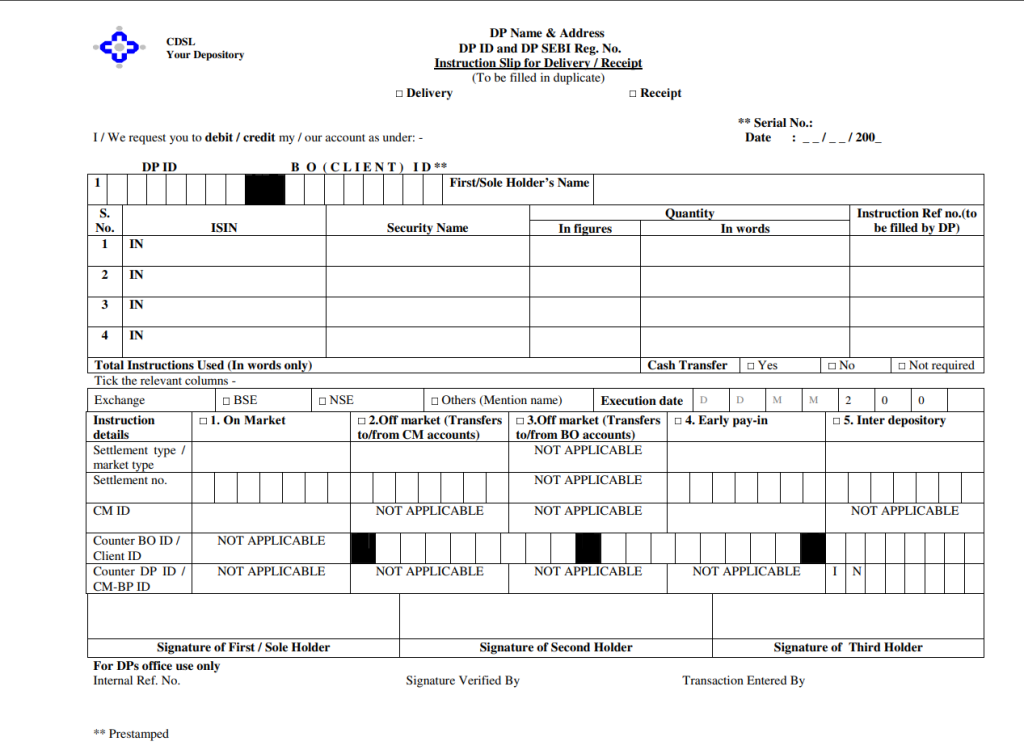
The steps below walk through this sequence field by field, so the form gets filled the first time correctly.
Latest Bond Updates:
- Rating Outlook vs Rating Watch: What “Negative Outlook” Means

- How to Do a Demat-to-Demat Transfer in India: CDSL Easiest Step-by-Step Guide
- Beyond the Rupee: Decoding SEBI’s ‘Second Shelf’ for Global Bonds
Step 1: Get the DIS Booklet From Your Broker/DP
Before you can fill anything, you need the physical DIS booklet from the broker or Depository Participant (DP) where your bonds currently sit. If you don’t have one, most brokers will let you request one through their support desk or app. Remember, your DIS is linked to your specific demat account, so you can’t use a booklet from a different DP.
Step 2: Fill in the Holder and Security Details
This is where most errors happen, so it’s worth slowing down here.
| Field | What to enter | Common mistake |
| First/Sole Holder’s Name | Exactly as it appears on your demat account | Using a nickname or short form |
| ISIN | The 12-character ISIN of the bond being transferred | Copying an ISIN from a similarly named bond |
| Security Name | e.g., “ABC Ltd. NCD” | Abbreviating or misspelling the issuer name |
| Quantity (figures) | Numeric quantity, e.g., 10 | Mismatch with the “quantity in words” field |
| Quantity (words) | e.g., “Ten only” | Leaving this blank |
| Instruction reference number | Leave blank—the DP fills this. | Filling it in yourself |
A useful rule to remember: a single DIS can carry a maximum of five ISINs. If you’re transferring more than five different bonds, you’ll need a separate DIS for each additional batch of five, and you must mention the total number of DIS slips being submitted in the “No. of Annexures” field.
Step 3: Select the Reason for Transfer
Tick the box that matches your reason for moving those bonds. For example, if you’re consolidating your holdings across different demat accounts with various brokers, you would choose “transfer to own account.” Don’t think of this as just a formality; it affects how the DP processes your instruction and whether you need to fill out additional fields (like consideration details).
Step 4: Bank and Consideration Details (Only for Off-Market Sales)
If you’re just shifting bonds between your own accounts or gifting them to someone, you can leave these fields blank. They’re only relevant when there is a sale happening, i.e., an off-market trade where money is changing hands. That’s also when stamp duty becomes a factor, which you can read more about here.
Step 5: Fill the Receiving Demat Account Details
This is the section where accuracy matters most, since these details go directly to the receiving account. You’ll need:
- Depository: CDSL or NSDL; select the one the receiving account belongs to
- Counter DP ID/CM BP ID: The DP ID of the account receiving the bonds
- Counter Client ID: The client ID of the receiving demat account
- Counter BO Name: The account holder’s name exactly as it appears on the receiving demat account
Pull every one of these details from the receiving account’s Client Master Report (CMR) or account statement, never from memory or assumption. For instance, if you’re moving bonds into a Zerodha demat account, copy the DP ID and Client ID exactly as they appear on the Zerodha CMR; don’t type them out from memory.
Step 6: Leave the On-Market Trade Section Blank
Demat-to-demat bond transfers are, by definition, off-market transactions, so there’s no need to fill in this section. It’s only relevant for transfers that go through a stock exchange.
Step 7: Leave the Execution Date Blank
Your broker or DP will fill it in once they’ve processed the instruction. Leaving it blank is intentional, not an oversight.
Step 8: Sign the DIS.
Sign exactly as per the signature registered with your demat account. A mismatched signature is one of the most common reasons a DIS gets rejected or delayed, so it’s worth double-checking against your account records before submission, especially if your signature has changed since account opening.
Step 9: Verify Before You Submit
Prior to sending the DIS form, review all information again to see that everything is correct, including ISIN, quantity, receiving account number, and your signature. Since bond ISINs can look deceptively similar across issuances from the same company, this step is where a second read genuinely helps.
Step 10: Submit to the Correct DP
Submit the DIS form to the DP where your bonds are currently deposited, not to the receiving DP.
Quick Reference: DIS Filing Checklist
- Holder’s name matches demat records exactly
- ISIN and security name double-checked against your holding statement
- Quantity in figures and words matches
- Maximum 5 ISINs per DIS; annexure count filled if using multiple slips
- Reason for transfer correctly ticked
- Receiving account details copied from CMR, not memory
- Execution date and instruction reference number left blank
- Signature matches demat records
- Submitted to the current (transferring) DP, not the receiving one
Quick Note: Booklet Costs and a Faster Online Alternative
- Your first DIS booklet (10 slips) is typically free. Most brokers charge around ₹100 + GST for additional booklets once you’ve used up the first one. Check with your specific DP, as this varies slightly by broker.
- If you’d rather skip physical paperwork entirely, you can opt for CDSL Easiest or NSDL SPEED-e. These let you submit off-market transfer instructions online instead of requiring a physical DIS. Registration is free, and it’s usually up and running within 24 to 48 hours (using a TPIN authenticated by OTP for each transfer).
- This isn’t a substitute for understanding the DIS itself. Many DPs still route certain bond transfers, joint-holder transfers, or first-time transfers through physical DIS. But for routine, repeat transfers once you’re registered, it’s considerably faster than mailing a physical slip.
Disclaimer
Fixed returns do not constitute guaranteed or assured returns. Investments in corporate debt securities and municipal debt securities/securitized debt instruments are subject to credit risks, market risks, and default risks, including delay and/or default in payment. Read all the offer-related documents carefully. This blog/article should not be construed as financial advice or as an offer or recommendation to buy or sell any security or any products/services of/on GoldenPi or any product/services of its third-party client(s). For a detailed calculation of YTM, visit our website. T&C’s Apply.